Aug 17, 2017 | Score!
FTC Disclosure: This is a sponsored post written in partnership with BloomsyBox. I was provided with a complimentary bouquet of the month from Bloomsybox.com for review purposes. The below opinions are my own. My full Disclosure Policy is here.

It’s amazing how much more chic one’s life can feel with a beautiful bunch of fresh blooms in your living space. It’s one of those little things that doesn’t necessarily cost a lot, but can really lift one’s spirits (as evidenced by the market for flower bouquet for numerous special occasions). BloomsyBox takes it a step further and asks why don’t we all just #treatyoself with a bouquet just for ourselves? We all probably tend to put other people first, so sometimes something indulgent like a pretty bunch of flowers is a well-deserved treat. So…why don’t we??
BloomsyBox is a flower subscription service which offers single-variety bouquets (which means no filler flowers that you don’t want). Every month is a surprise as to what seasonal flowers you receive, and you can sign up (or gift) Small, Medium, or Large size bouquets starting at $39.99/month. If that’s not enough for you, you can also sign up for bouquet delivery every 2 weeks, or every week if you want! Also, if you are a rose lover, you can receive a monthly flower subscription of roses every month (and check out all the cool varieties they offer…I’ve never seen some of these offered with a floral subscription service!).
Summer is in Full Bloom with a BloomsyBox Subscription Box

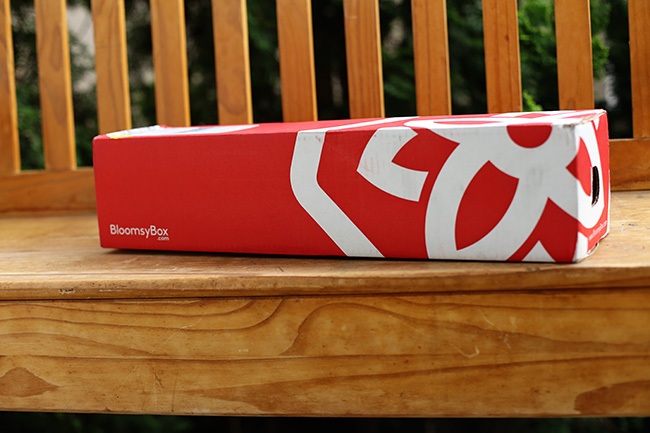
The box I received for August opened to reveal a wrapped bouquet of Free Spirit Roses, which are a rare orange and hot pink rose variety with an absolutely staggering petal count that open super-wide once in a vase. BloomsyBox includes with every shipment a detailed “Bloomsy Facts” card about the flowers you receive, which is particularly interesting.

They also are Rainforest Alliance Certified, using less water, more efficient farm management, and improved conditions for farm workers, so you know you’re doing something good for the environment with a purchase.
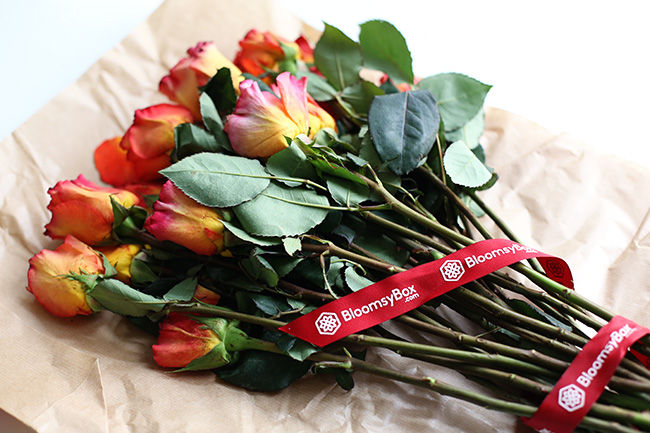
This is how they look when they arrive. They look pretty small and compact, yes? Well, just you wait!

Day 1: Put into a vase following the included Tips to Enjoy Your BloomsyBox Instructions, the Free Spirit roses still seem pretty small and crumpled.

They smell really fragrant…but aren’t really show-stoppers.

Day 2: The roses have begun to settle and open. There are about 20 of them in there.

Day 3: Uh-oh. These are already too many for the vase!
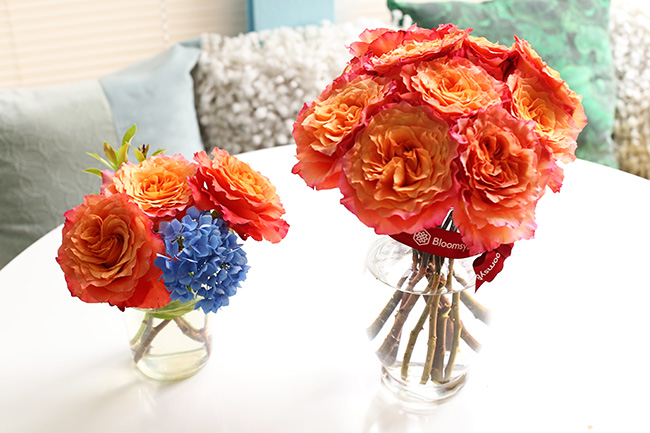
On Day 3 I removed a few flowers and made another arrangement with flowers from my garden.
And then Day 4 I had to remove more…and more…and more…until by Day 6 I could only comfortably fit 8 blooms into the large vase because the blooms were so wide!
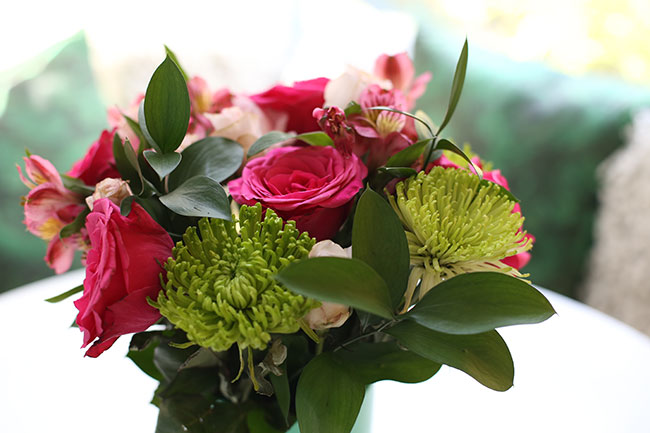
That’s how big each rose opens up to! Unbelievable! I literally have 5 vases of roses decorating my home now…

The BloomsyBox bouquet is still going strong into Day 7…and the number of blooms was so generous I was able to share with coworkers too and spread the happy around.
BloomsyBox will keep you #BloomingHappy all month long!
xo
Carly
Leave Comment
Feb 10, 2017 | DIY

This project is in collaboration with
Paper Mart. I was provided supplies to create a Valentine’s Day tutorial. All opinions are my own. My full Disclosure Policy is
here.
No matter how beautiful real flowers are…sometimes you want something that can last forever…and can be the exact colors and style you’re looking for. I understand. We all want this.
Enter the DIY floral craft: the crepe paper peony, a pretty layered flower that can be any beautiful color scheme you wish…and will last no matter the occasion. For this tutorial I’ve teamed up with Paper Mart again to bring you a fun DIY right in time for Valentine’s Day. Here’s how to make it:
How to Make Your Own DIY Paper Flowers (Crepe Paper Peonies)
You Need:

choose your favorite colors: ivory crepe paper / rose crepe paper / pink crepe paper / hot pink crepe paper / light green cloth-wrapped floral stem wire / round ball or ornament / scissors / hot glue & glue gun
How To:

1. Tear a long strip of crepe paper (perpendiular to the grain) along the top edge of one of the colored rolls of crepe paper. Tear another similar length from the white crepe paper.


2. Start rolling up the crepe paper into a bundle, folding back on itself and crumpling the folds here and there for a more natural look.

3. Use hot glue to glue down the folds into a roll.

4. Keep adding layers of white and colored crepe paper ripped edges until you have built up a nice thick roll.
5. Use scissors to snip the top edges and distress them.
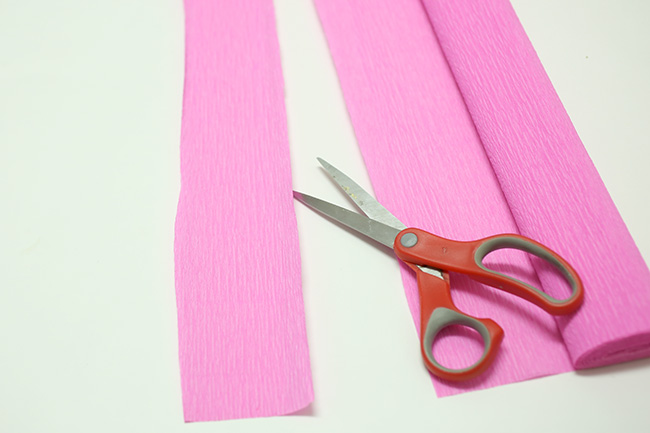
6. Cut a long piece of colored crepe paper about 2″ wide, parallel to the grain.

7. Fold the paper on itself to create a stacked accordion.

8. Cut a petal shape in the stack, with the bottom of the petal at where the folds are in the stack.

9. Separate and spread each petal pair over a round ball, stretching and shaping the paper to the ball.


10. Glue the center roll to the middle of one of the rounded petal pairs you just made.

11. Glue another petal pair onto the bottom of that, at a 90-degree angle to the previous petals, and fold the petals up around the center, cupping it.

12. Keep gluing on more petals, making more from different colors of paper, and cupping around the center as you go.

13. For a more rounded shape, overlap slightly and glue the edges of petals together.
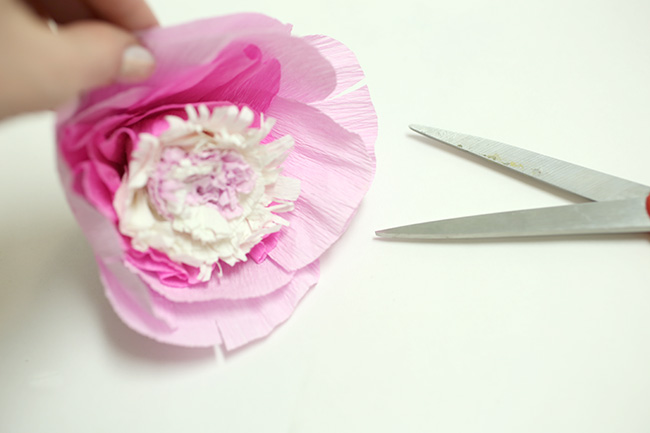
14. Cut small notches in the edges of the large petals to look like a real peony.

15. Cut a 1.5″ wide piece from the white crepe paper (parallel to the grain) like in Step 6, accordion fold it, and cut joined leaf-like shapes from it.
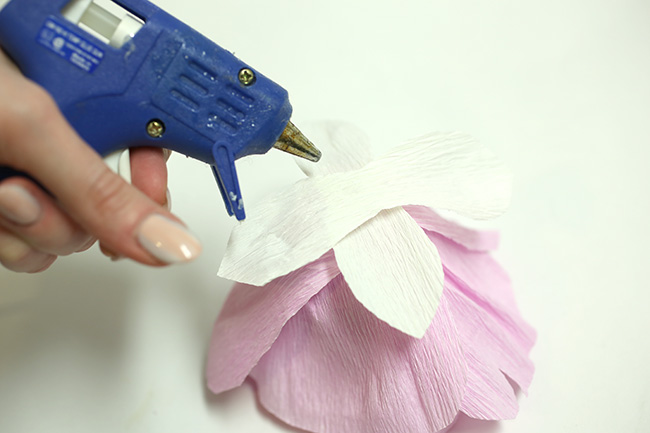
16. Glue the white leaf-like shapes in an X to the bottom of the flower.
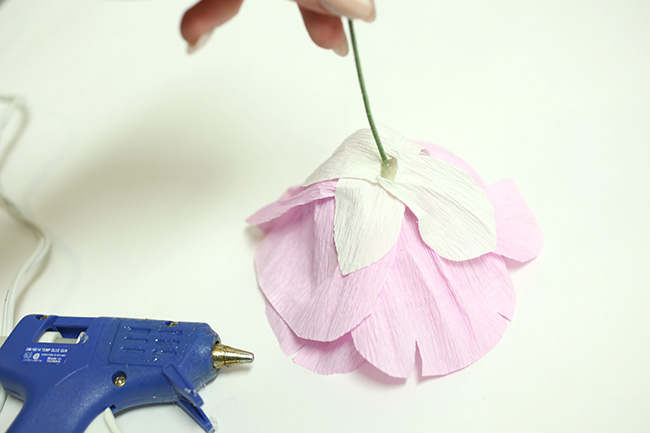
17. Stab the floral wire into the center of the X, pushing through several layers deep into the flower center. Hot glue around the hole in the bottom to secure.
And you’re done!
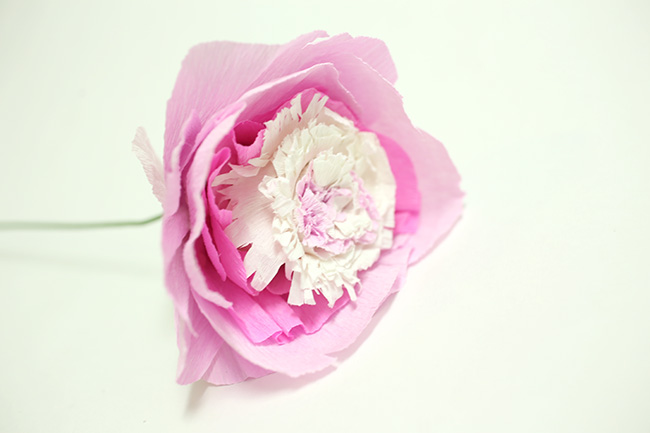
These flowers are kind of fiddly to make, so I recommend having something to watch on TV whilst doing it…but the results are so satisfyingly worth it!
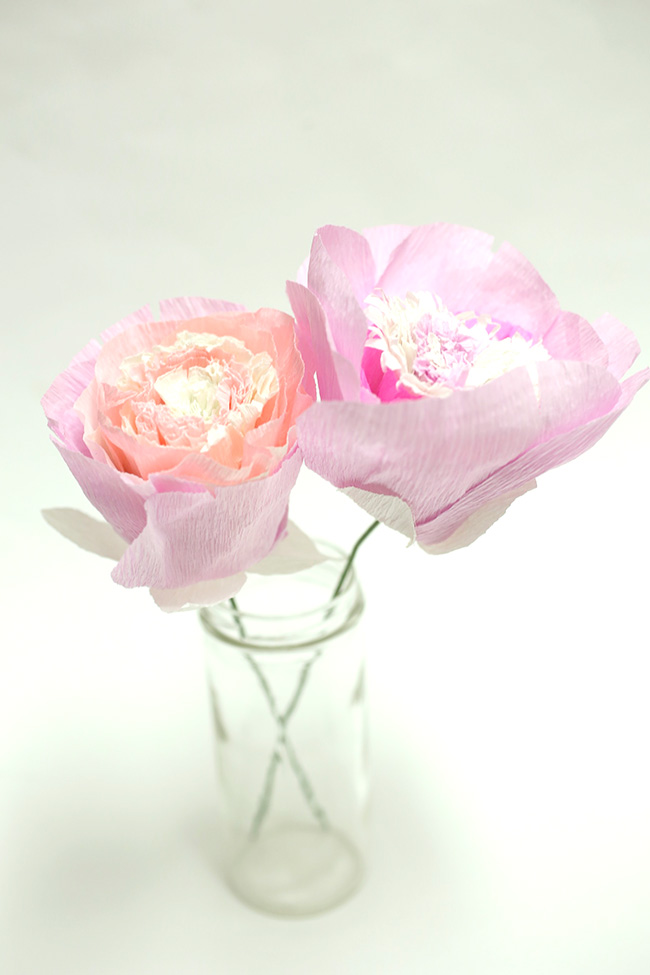

Pretty, unique to you, and everlasting…what’s not to love?
So some of you may also be wondering…why are we using crepe paper for this when regular paper could work just fine too?åÊ Well here’s why…
Why You Should Use Crepe Paper for Floral Crafts and Flower DIYs

Crepe paper lends itself really well to creating petals and leaves, because of its natural texture. If you look closely, although the petals of some flowers may appear smooth, many have a slightly wrinkled or puckered texture that is well-mimicked by the crinkles in crepe paper. Got a leaf or a petal with a a veiny, ribbed texture you want to recreate in a realistic floral craft? It’s very easy to duplicate using crepe paper…whereas a regular un-textured paper will look flat and unnatural compared to the real thing. The problem is that crepe paper can be too crinkly overall, so stretching the crepe paper out when making flower petals will produce a texture that is smooth, curved, and stretched out in one area, and tapering down to an area that is crinkled and puckered. This looks very realistic! (This technique works great for roses, plumeria, or peonies that have smoother petals, whereas stretching may not be necessary for daisies, cosmos, zinnias, or other varieties.) Try it sometime to see how much more realistic your fake flowers look when you use crepe paper for your floral crafts!
 Happy DIY’ing!
xo
Carly
Save
Save
Save
Leave Comment
Apr 21, 2016 | DIY
FTC Disclosure: I was provided with a complimentary bouquet of my choice from ProFlowers.com to create a DIY tutorial. The below opinions are my own. I have not been otherwise compensated for this post. This post may contain affiliate links, wherein if you click through and make a purchase I receive a small percentage of the sale. My full Disclosure Policy is here.
 With the Weekend 2 of Coachella coming up, you’re probably prepping your floral crowns and boho headdresses right now – or even trying to reuse what you had from the first weekend. By now perhaps your flowers have withered or maybe you want to go for an entirely different look the second time around. Why not try a handmade leaf and crystal crown and stand out from the crowd? Here’s how:
DIY Music Festival Leaf and Crystal Crown (for Coachella, Bonnaroo, etc.)
I received a beautiful bouquet from ProFlowers.com, reviewed here – and wanted to try something a little different with the included greenery.
You Need:
crystals (preferably drilled) – mine are C-grade Quartz Crystal Points / thin brass jewelry wire (20ga+) / wire cutting pliers / gold-tone headband with decorative piece (mine is from Target) / green leaf stalks and/or flowers
How To:

1. Thread one of the crystals onto a long piece of cut wire, and place onto the flat design element of your headband. Start wrapping one end of the wire around the headband wire, leaving a couple inches at the tail end.

2. Secure the crystal by continuing to wrap.

3. Add another crystal on, and wrap the wire around the headband base again to secure. Keep adding crystals on in this manner, in a row.

4. When you are satisfied with the number of crystals secured to your headband, wrap the wire around the headband base a few times to secure, leaving a couple inches at the tail end.

5. Now is when those couple inches of wire come in handy. Place a green leaf stalk near the crystals, and wrap the wire end around the stem to secure. Wrap any sharp ends underneath so they don’t stick out.

6. If needed, add another piece of wire to wrap the stalk to the headband. Cut the stalk about 2″ shorter than the end of the headband, and secure with wrapping the wire around it.

7. Once your greenery is secure, you can add flowers to fill in gaps if you like.

Pretty easy!

And pretty!

In order to preserve your crown until you’re ready to wear, keep in a cool, dark place (like your fridge!) Enjoy-and feel like a woodland queen for your next festival or Summer gathering.
Happy DIY’ing!
xo
Carly
P.S. The weight of the crystals and stems is pretty hefty, which is why you need a strong base. There are other flower crown tutorials out there using dead-soft jewelry wire or elastic, but I wouldn’t recommend either because they would bend or get weighed down. Using a finished store-bought metal headband (made of tempered hardened metal) will provide a strong enough base – and it is ideal if you can find a headband that is 2 wires with a space between them (like this one). I couldn’t find one like that, so went with a headband that had some wire detailing in an area that would work well to wire some crystals on to. (Plus, you can remove the wire and floral elements and just wear the headband once your greenery dies!)
Save
Leave Comment
Apr 15, 2016 | Fashion
FTC Disclosure: I was provided with a complimentary bouquet of my choice from ProFlowers.com. The below opinions are my own. I have not been otherwise compensated for this post. My full Disclosure Policy is here.

Though Mother’s Day is about a month away still, now’s the time to plan ahead.
To that end, ProFlowers has you covered with a variety of beautiful bouquets for every pricepoint.


ProFlowers Deluxe All the Frills Bouquet in Teal-Dipped Vase
I love that you can choose the type of vase you get the flowers in – which means you can customize it for your recipient.

(I mean, how cool is this pretty teal-dipped vase above??) Many other online florists only offer the vase as part of the arrangement, and you’re stuck with what they’ve chosen. Major point in ProFlowers’ favor!
 You can specify delivery date at no charge (not a range-the exact day itself, which is awesome!) to make sure your recipient will be available on the date of delivery. When the flowers arrive, they’re boxed up in their nifty box with the card/greeting inside. The larger flower heads are even carefully wrapped to ensure perfection upon arrival!
 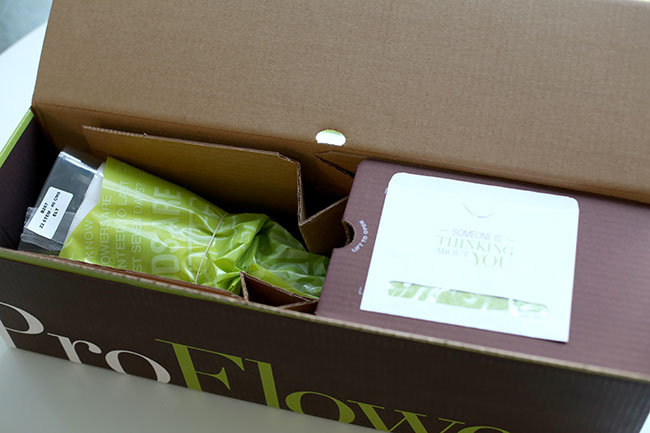 There are not 1 but TWO packets of flower life extend powder in the box, as well as detailed instructions for caring for your bouquet. (Other online stores don’t include instructions – kind of a no-brainer, no?)
Once in water, the flowers have a 7-day freshness guarantee, and the two packets of powder allow you to really extend their life. Mine are still alive at 15 days out!

You can also follow ProFlowers for updates, promotions, and shots of gorgeous, drool-worthy blooms here:
Facebook / Twitter / Instagram (my fave!)
So what are you waiting for? Hurry up and book a beautiful bouquet for your mother, graduation, birthday, or just because.
Shop ProFlowers and Save
xo
Carly
Leave Comment
Dec 1, 2014 | Fashion
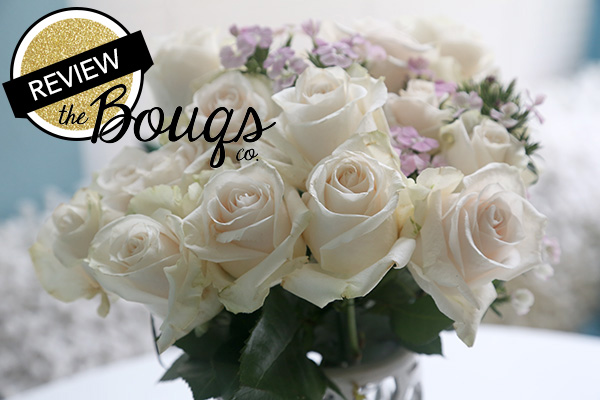 Who loves fresh flowers around the home? Hands up if you do! And if you do, you’re probably aware of how costly that can be to maintain. And how hard fresh flowers are to come by at certain times of the year. And the toll they can take on the environment (depending on where you get them). The answer to that: The Bouqs Co. (the new floral kid-on-the-block with awesome South American flowers picked from the side of an active volcano). Yup, you read that right: an active volcano. And yet they offer a huge variety of flowers, delivered FREE (always!), fresh to your door.
 The Bouqs Co. kindly sent me my choice of bouquet to review. I chose the Peace Bouq, since I love white flowers in the Wintertime. The website was super-easy to order from and way more intuitive than most floral order websites…you know the ones I’m talking about (that look like they’re been around since 1994). Within 10 days of ordering the flowers were at my door (and you can of course specify what date you’d like them delivered on).

Above is how the flowers come wrapped, to protect them on their journey all the way from South America. The box was very sturdy and the flowers were not crushed in the least from transport.
 They had some preservative gel on their cut ends to prevent them from drying out, which easily wiped off. Though some had wilted a bit on the way, once in water they perked right up again.

 Fragrant, luscious, environmentally-friendly, FREE SHIPPING…what’s not to love?
Here’s the amazing array of all the flowers Bouqs has to choose from:

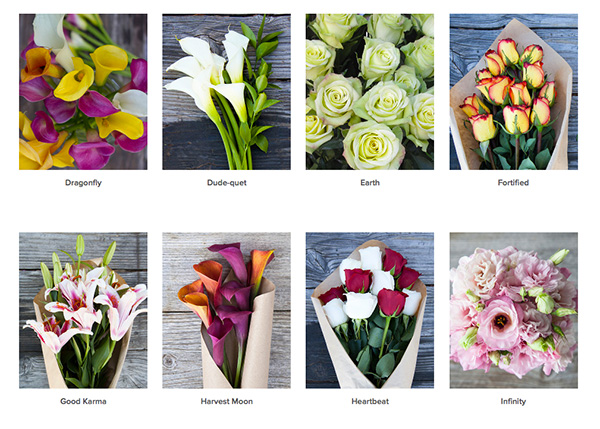


See any that strike your fancy? For today, Cyber Monday, you can select any Original-sized Volcano Bouq and use code DOUBLEBOUQ to get DOUBLE the flowers (the Deluxe-size for free!). Valid until the end of 12/1/14.
Also, other promotions going on for Cyber Monday (valid until 12/3/14):
Send at least 4 Bouqs, get 25% with code CYBERBOUQ
Buy a gift card to The Bouqs Co., and save up to 20% off the retail price
You can knock off all your holiday gift-giving, or be super-organized and schedule out your Valentine’s Day, Mother’s Day, friends’ birthdays, and new baby bouquets all in one go.
Definitely try out The Bouqs Co. and see what it’s like – you’ll be impressed with the quality of fresh flowers, year-round, delivered to your door for no hassle.
xo
Carly
FTC Disclosure: I was provided an Original-sized Bouq for review purposes. I have received no other compensation for this post. The above opinions are my own. This post contains affiliate links, which means I receive a small commission if you click on a link and purchase something. To read my full Disclosure Policy, click here.
Leave Comment