DIY Home: Pretty Patterned Bathroom Cabinet Makeover

Along with the DIY $5 Bathroom Drawer Makeover I did last year, I decided to also give the insides of my bathroom cabinets a facelift with some shelf liner paper and washi tape.
It’s super-easy to do the same – and it provides amazing results. Here’s how to give yourself a little pop of happiness each time you open the medicine cabinet:
DIY Pretty Patterned Bathroom Cabinet Makeover with Shelf Liner Paper
You Need:
sticky-back shelf liner paper (or removable wallpaper!)…I believe my shelf liner paper was actually from a recent trip to HomeGoods / washi tape / sharp Xacto knife or box cutter / scissors / measuring tape
How To:

- My bathroom cabinet was a mess – overflowing with expired meds, unused items, and general junk. (If yours is only half as bad I’ll feel slightly better. I mean, who keeps a bottle of silly putty slime from their son’s 7th birthday party in their medicine cabinet??! (My son is now 10 and a half.) But I digress.) The first step in a makeover is to remove!

Remove everything and go through it mercilessly.

2. Wipe down the inside of the cabinet and remove the shelves (if you can). Apply a pretty washi tape to the edges of the shelves, cutting the ends flush with the ends of the shelves.

3. Measure the inside of the cabinet and cut a piece of shelf paper that matches in size. Remove the backing to the paper and, starting at the top inside of the cabinet, start applying the paper, smoothing down as you go.

4. My cabinet had screws in the center of the back, so I used a box cutter to carefully cut out a round hole for each screw as I encountered it. I then carefully smoothed the shelf paper around it to remove bubbles and lumps.

5. Once the paper was flush with the back of the cabinet and secure, I replaced the shelves.
And the pared-down pile of junk I still wanted to keep in there!

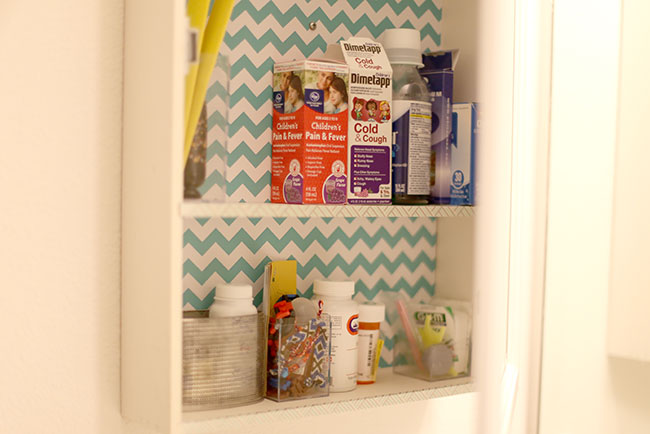
It looks a lot better, no? All in all – it took my about 15 minutes – and it makes me grin every day when I open it and see how pretty it is on the inside. I chose not to do the sides of the cabinet or the inside of the door just yet…because I think I want to do something different with the back of the door!
Here’s one more time, before…
and after! A huge improvement, and I’m totally happy with it.
Tell me: Have you gone crazy and papered the inside of your cabinets yet?
xo
Carly
Leave Comment


