Jun 26, 2020 | Blogging
Hi friends!
Last week I sent out a survey to my email subscribers to find out what you wanted to see on Chic Creative Life.
I’ve been trying to figure out what content resonates, and what would be really helpful to my audience now. This blog has gone through many iterations, and I wanted to make sure it is aligned with what my readers want!
….And when I saw the results, boy was I surprised! Check them out below:
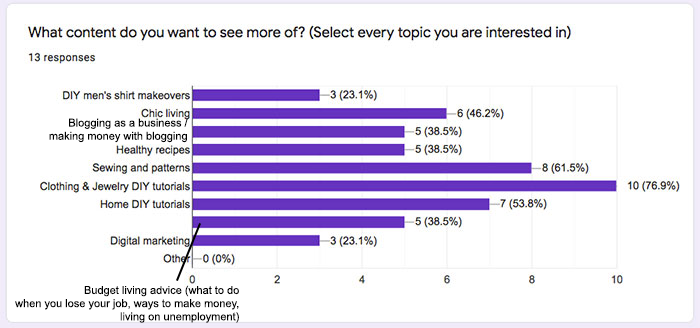

So it seems people want to read about, in order of number of votes, 1. Clothing & Jewelry DIY Tutorials, 2. Sewing and Patterns, 3. Home DIY Tutorials, and 4. Chic Living. Followed closely by Budget Living, Healthy Recipes, and Blogging as a Business topics. I was actually not surprised there were more requests for home DIY’s and chic living advice (since so many of us are home right now)…but I was definitely surprised there wasn’t more interest in DIY men’s shirt makeovers! Considering I’ve been putting a ton of time into it…these results are definitely eye-opening.
I want to thank everyone who took the survey, this is really helpful!
I’m going to work to shift my content more towards what the majority of my readers are wanting.
If you haven’t taken the survey yet and would like to weigh in, you can still do so here:
xo
Carly
Leave Comment
Aug 15, 2017 | Blogging
 Hi friends,
It’s been awhile!
Since January I have been working to rebrand and redesign the Chic Steals brand and website into something that reflects who I am now and what I’m passionate about.
I have struggled with what to do with this website for over a year, initially posting here about taking a break to reassess things, and then here about whether to quit or continue a blog that didn’t reflect my interests anymore. In short, I felt Chic Steals was no longer a reflection of who I am now. Specifically, I have moved away from constant trend-following, fashion acquisition, and “stealing” ideas to make carbon copies. I’ve found that sometimes what’s cheapest doesn’t always last.
DIY’ing is fun to an extent because it flexes that all-important creativity muscle…but I began to feel like if I’m going to take the time, energy, and resources to create something and add it to the world, it better be good – and be there for the long haul. I had begun to feel that I couldn’t serve my readers well, or continue to post about things that I felt were trivial and overly consumerist in the grand scheme of things. Plus, there was a lot of content that was hastily-photographed or written without a thought of what value I was adding to the world. As with a DIY project, if I was going to be putting energy into a blog and website, I wanted it to be something I was ultimately proud of, that helped people. Plus, with everything that has been going on in the U.S., I wanted to spend my time adding beauty to the world, not taking ideas, but ultimately adding value to all.
This whole rethinking of things was a long and arduous, soul-searching process, but I ultimately decided the only way forward with my website was to get ultra-focused on what I’m passionate about, get ultra-picky about what I post about, and become ultra-invested in the site and my readers.
So it required financial investment in getting better: an overhaul from the ground up, an entire rebrand, a huge content edit, and a complete redesign of my website.
And it’s been in the works for seven months now.
Finally we have reached the last few days of work, and launch is imminent. So here it is, the unveiling of my new website, brand, and goals:
Chic Creative Life.
Here are some of the changes you’ll see (I am updating the below as the switchover occurs):
Content
- Chic Creative Life is a lifestyle website and blog, focusing chic living (frugally), with a hefty dose of creativity. DIY and making things yourself will still be a focus, though I will be sharing more articles on advice for living your best, most creative, inspired chic life.
- Categories on the site have been consolidated from 175+ down to 11. Should make posts A LOT easier to find.
- I’ve paused email newsletter delivery for awhile as I was migrating from MailChimp to my new email delivery system and hooked into the new site. Getting this restarted may take a little time, but it is in the works, and if you signed up to receive Chic Steals blog content as a newsletter in the past, you will start to receive blog content digests from Chic Creative Life.
- You will have the option of also signing up for less frequent, targeted content updates from the site, including Spoonflower Fabric Designs, Decor Items Added to Decor Shop, E-Courses and E-Books, etc.
- I have retired a number of old posts because they no longer reflect the message I want to put out there.
- I have edited a number of old posts to be clearer or better written. There are still some photos that are missing from old posts. I’m working on restoring everything, but with 1900+ posts over 9.5 years it’s still a work in progress.
URLs
- ChicSteals.com and Chic-Steals.com will redirect to ChicCreativeLife.com (clicking now you’ll just see a preview page until CCL goes live)
- All my social accounts that are under the Chic Steals brand (Facebook Page, LinkedIn Page, Twitter) will change to ChicCreativeLife-branded, with URL’s reflecting this change (may be slightly different depending on what’s available at the time of switchover)
- Pinterest and Instagram accounts are under @carlyjcais and will not change
- I’ll be moving my blog in the back-end of Bloglovin’ so if you follow Chic Steals through there you will just see the name change in your interface, but your feed should not be interrupted.
- If you receive content via RSS Feed, you may need to update your subscription to http://feeds.feedburner.com/ChicCreativeLife
- My email will switch to [email protected] (super-long, I know). My old @chic-steals.com email address will be deactivated – so don’t use that one if you actually want me to answer.
Design
- In short: better.
- The landing page of ChicCreativeLife.com will be a portal for blog content, fabric designs, shoppable home decor, and downloadables. Blog post index will live at ChicCreativeLife.com/blog but individual blog post-pages will still have the same slug as they did on ChicSteals.com, with no /blog preceding them.
- The DIY Gallery has been consolidated with rotating image carousels instead of an image-heavy gallery of all my DIY tutorials. Easier to scroll through and see.
- Many new pages have been added to showcase my fabric designs, my home decor designs, and my downloadable E-Courses and E-Books. Some items you can buy directly on my site through the Gumroad integration, some are hosted on other sites (Stars + stones fabric designs on Spoonflower, CarlyJCais home decor and artwork designs on Society 6).
- The mobile design has not been given the same amount of time and QA as the desktop version. If you are experiencing something strange on mobile, please let me know.
Phew! I think that’s it for now.
As we make the switchover, some links/feeds will get buggy. Image URLs might not be all there. Categories/Tags may be wonky. Posts from long ago may go missing. Social media channels may not all be connected or working properly. Contact forms may not be working. Emails may deploy. In other words, digital Armageddon may indeed happen with Chic Steals and embroil all of you in it.
[Tweet “You have to tear down the old to build anew.”]
But I’ll get it right soon… and everything will live at
Hope to see you there!
xo
Carly
Leave Comment
Feb 1, 2017 | Blogging

This is a series of posts about blogging as a business (with a focus on the craft/DIY/lifestyle/fashion blogging niches). Designed to help other bloggers and creatives, from setting up one’s own blog to growing it, monetizing it, scaling it, and optimizing it, and all the business details you want to know. Leave any ideas you have for future topics in the comments, and you may see your topic discussed in a future post!
Hi friends, I’m experimenting with a new post series: Blog as a Business.
As many of you may know, I’ve been blogging for 9.5 years now, writing content for other blogs, consulting on blogging, SEO, and marketing, and designing and setting up other people’s websites and blogs. I’ve learned a ton in this space simply by doing it (which was enough for me to first get a job as a Social Media Manager and Content Marketing Manager, then as a Marketing Director, and now as a Marketing Manager, which is what I now do full-time). I figured that all this could help out other people if I start sharing about what I’ve learned over the years, especially when it comes to the unique niche of DIY/Craft, Fashion, and Lifestyle Blogging. So here goes….
After 9 years of running Chic Steals, I felt at an impasse. I felt exhausted, burned out, and uninterested. Not only did my blog not look like how I wanted it to anymore, but I was just not truly passionate about the content I shared. Times had changed, and I felt a growing disconnect with my blog. The fun hobby had now become a burden.
I’m sure there are other people out there like this, who are reaching a stage of burnout in their endeavors. As life and circumstances change, it becomes more and more difficult to keep your original interests up with the same fervor. Everyone likely reaches a point where they say:
Is it Time to Quit?
Here’s how to figure it when it’s time to call it quits, or keep going with your passion project:
Figure Out Where the Disconnect Is
- Make a list of why you began this endeavor in the first place. Hint: You MUST be brutally honest. List all the reasons why you started, however big or small. If you aren’t honest with yourself, you will never be able to move forward, and will constantly remain in a state of limbo.
- Add to your list any reasons that you have, over time, discovered to be good reasons to keep going with it. Again, brutal honesty is key.
For me, my reasons for starting my blog back in January 2008 were:
- sharing the crafts and things I made with other people to help/inspire/teach them to make similar things
- connecting with other people about our similar interests (crafts and fashion) even while being a stay-at-home mother
- share my thoughts and ideas with other people and discuss things
- stay on top of fashion trends I am interested in
- be a fashion icon like other fashion bloggers <*cringe>
And further reasons I discovered over time:
- becoming a somewhat known blog in the DIY/craft niche
- becoming an authority on DIY, specifically DIY fashion, sewing, construction, and craft
- honing my skills in writing, photography, SEO, HTML, CSS, marketing etc.
- steadily making money from my blog after monetizing it in 2013
- challenging my DIY and branching out in my crafting skills
- the connections and collaborations I created with other bloggers, magazines, websites, and brands
- free stuff!
- and my really, really awesome readers!
- Okay, now you have your list of reasons, Original Reasons and Additional Reasons. Here is where the truth lies. Go through each one and rank it in how important it is to you at this point in time, with 0-5, 0 being not important at all…5 being super-duper important now.
- Once you’ve added a ranking next to a reason on your list…write a reason why you gave it the rank you did.
My example continued….
ORIGINAL REASONS I STARTED A FASHION & DIY BLOG, RANKED
- sharing the crafts and things I made with other people to help/inspire/teach them to make similar things (2 – I still like sharing, but I now have so little time to create lots of DIYs to share. I don’t DIY or craft much anymore in my day-to-day life.)
- connecting with other people about our similar interests (crafts and fashion) even while being a stay-at-home mother (2 – I’m no longer a stay-at-home mother, and crafts and fashion are not my most passionate interests right now)
- share my thoughts and ideas with other people and discuss things (2 – I have a day job now and discuss things with other people on a regular basis)
- stay on top of fashion trends I am interested in (1 – I barely pay attention to fashion trends anymore, I’ve developed my own sense of style and am uninterested in the consumer forces shaping fast fashion)
- be a fashion icon like other fashion bloggers <*cringe> (0 – this stemmed from a feeling of inadequacy I had. I don’t care about being a fashion icon, I am uninterested in other fashion bloggers’ style. I’ve finally accepted myself, and I no longer have anything to prove.)
Those numbers^^ are where the disconnect is. Anything below a 3 is going to show you that you no longer consider the endeavor worthwhile in your current state. That’s why it’s essential you are completely honest with yourself and take a long, hard look at your past motivations for your endeavor. Anything at 3 or above is going to tell you that these reasons are still important to you now, and those are the reasons you should pay attention to.
So, let’s set about fixing it…

Photo from DIY Glittery Gold Geometric Pushpins tutorial
What to Do About Your Passion Project Now That You’ve Found Out Why It Isn’t Making You Happy Anymore
Now that you’ve identified any disconnect between reasons you began or kept going with your project, now it’s time to figure out if you want to forge on…or give it up. There comes a time in everyone’s life when they are faced with the choice of barreling forward…or laying something finally to rest. Here’s how to figure out which path you want to take:
- Make a list of all that your project is right now. Just list them, big or small. It’s important here to be very honest and self-critical. Invite others you trust to share their opinions so you can get some perspective.
- Take everything that was 3 or above from the first Disconnect list, and imagine your life without them. What would your day-to-day look like? What would your weekends look like? I really enjoy lists (obvs), so I made a list of Pros/Cons for each 3 and above -ranked reasons.
- When you went through the above imagining exercise, for every 3 and above-ranked reason that you feel a significant emotional attachment to (like “oh no! I wouldn’t want to lose that!” put a star next to)
- Question to ask yourself: ARE THOSE STARRED REASONS THAT YOU HAVE EMOTIONAL ATTACHMENT TO…ENOUGH TO KEEP GOING? Only you can answer this question. Think of future you and what s/he will say looking back on this moment and this endeavor. Will throwing in the towel bring relief, or regret that you didn’t have the drive to keep going at the time? What could lie in store for you if you pushed through this impasse?
- Finally, write a list of what you want your passion project to do. If you see enough discrepancy between what you want it to do for you, what it is now, and the emotional attachment you have to it, if the gap is big enough…it’s time to let it go. Let it go, say you had a wonderful time with it, but you have changed and it is now time to move on. Move on to the next – it is not a failure! – and find another passion project that does what you really want it to do.
BUT if there isn’t a huge gap…if with a little re-dedication and work your passion project could once again align with what you want, if you’re significantly emotionally invested in it…explore your options for keeping going with it. Can you redesign it? Realign it? Rebrand it? Rethink it? Here it is wise to have a brainstorming session with friends and people who have faced similar obstacles.
In my case, I talked a great deal with my friends who’d known me throughout my years of blogging, as well as consulting with my fellow bloggers and members of Portland Bloggers. I found that I was still emotionally attached to my blog, I didn’t want to abandon my readers, I enjoyed making money and getting free things (which really helps with my tight monthly budget), I enjoyed being an authority in this niche, and giving all that up would have felt like too much of a loss. So I decided to rebrand, redesign, and realign my blog more with my goals (which I defined more clearly in a separate exercise).
I found that separating out the process of asking whether it was time to quit or go all-in to my blog, from the larger question of what are my ultimate goals for it, helped clarify things better than just going around and around in my head on the larger issues. Working things out step-by-step in this way allowed me to finally break through more than 6 months of indecision and move forward in a positive, fulfilling way.
It is, after all, what we actually do – and not what we try to do or think about doing – that defines who we are and our contributions in life.
Have any of you ever dealt with a passion project stalling or losing momentum? How did you break through?
I’d love to hear about your questions or ideas for future topics! Leave a comment below and I’ll help you out 🙂
xo
Carly
Save
Save
Save
Save
Save
Leave Comment
Apr 19, 2016 | DIY
FTC Disclosure: This post is in partnership with FontBundles.net, where you can get a variety of beautiful fonts for great prices (around 96% off the regular price!) They also offer a free font download every week. My full Disclosure Policy is here.
 Hi friends – today, as promised, I’m sharing the tutorial for how to create your own digital typography art.
You see it all around the internet: pinned on Pinterest, prints on Etsy, shared on Instagram…the font-based typography layout as art has taken the world by storm. There’s nothing like a motivational or inspirational quote to get your going in the morning, or inspire you to pick up when you’ve lost steam. So here’s how to make your own:
DIY Digital* Gold Typography How-To
I’m using the Sobbers font from the Spring Bundle from FontBundles.net if you’d like to follow along. I’m also using Photoshop CS6 on a Mac – so replace any CMD (command) with CTRL (control) keys for PC’s.

1. Create a new file, size it square, 72dpi, RGB. Save it as a .PSD on your desktop or somewhere as your working file.

2. Hit T for the Type Tool shortcut, choose Sobbers font, and type one word on the canvas. Type the 2nd word. Type the 3rd word. You want each word to be separate (and to commit your typing, hit CMD Enter to exit the Type Tool and start another word).

3. SHIFT-select your 3 separate words (that are all on their own layers) and choose the vertical align option from the Align panel to center them all to each other. I chose not to center to the canvas but you could do that by selecting all the layers and aligning them.

4. With all 3 layers selected, press and hold SHIFT and OPTION keys, grab the lower right-hand corner of the transform control. (Make sure your “Show transform controls” option is checked when the Move tool (V) is selected. Drag it out so all the words are sized larger so they look nice on the canvas but are still aligned center to each other.

5. Now select each single layer and move closer together so the spacing between them sees comfortable.

6. I chose to resize both the words “Spring” and “Action” larger, again keeping the 3 words vertically aligned with each other.


7. Then, move the words closer together again so they “fit” well – paying attention to creating similar white space between the ascenders and descenders of the font, and creating a path of movement for the eye through the artwork.

8. Select all your word layers and choose CMD G (or CTRL G on a PC) to group them. I renamed my group “Words.” Then create a new layer (CMD SHIFT N) and hit OK.

9. Choose the Gradient tool (G…keep hitting SHIFT G to cycle through the tools until the Gradient is chosen). Double-click on the gradient image at the top left of the window to open up the Gradient editor. I chose a 5-point gradient that was gold with 2 lighter stripes in it. Hit OK.

10. In your new layer, click near the top left and drag the gradient down to the bottom right.

11. To place (“clip”) the gradient to your words, hold down the OPTION key, hover over the line in-between the gradient layer and the “Words” group, and the cursor will change to a little bent arrow next to a box. Click on the line and you will “clip” the gradient to the letters.

12. If you don’t like the placement of the gradient, select the gradient layer and just use the Move tool to move it around on your words. I had to play with it a bit, enlargening it and spinning it around until I liked it. Finally, create a new layer again and type your name, website name, or whatever you like in there. (I tend to type in black and set the Blending mode to Multiply, at 35% opacity. It’s something you have to play with to see if you like the results.)
 And that’s it! It’s really simple to make with Photoshop (or GIMP, for that matter) – with spectacular results. Now you have something all your own that you can share across your channels to inspire your friends and family with quotes, ideas, funny phrases – anything!


Happy DIY’ing!
xo
Carly
*Note: this tutorial is for digital typography – if you want to create something for print you need to set up your file as CYMK 300dpi.
Save
Leave Comment
Jun 16, 2015 | Blogging, DIY
 I’m a scheduler, and I love my To-Do lists more than anything. But…life is COMPLEX, and I can’t wander around with a million bits of paper with to do lists written on each. In managing this blog I need to be able to see at a glance all the days in the week – and the month – so I can plan out what I want to (ideally) post here. I’ve tried a digital calendar, which I’ve found doesn’t work for me because I like to jot ideas down on the side, rotate ideas for posts in and out of the hopper, or brainstorm away from the computer. I’ve tried a date book, which is too small for me to see the whole month at the size I need. And no matter what offline solution I’ve tried, I was constantly erasing things and having to rewrite posts on new days if I made the smallest change. Sooooo frustrating!
But now I think I’ve found the best solution to my blog planning problems: a DIY Blog Calendar, that uses washi tape as a way to organize posts once you’ve brainstormed them. No erasing necessary! And it’s super easy to put together. Here’s how to make your own DIY Washi Tape Blog Planner (which is yes, quite intuitive from the photos):

1. Print out your favorite calendar for the month. I turn off all my scheduled events and print a month’s view of iCal just so I can get the structure. I prefer to have a piece of paper for each month as I go, rather than using a laminated sheet and a dry erase marker, but you could do that too.
2. Tear small pieces of washi tape off, folding one edge under about 3/6″. This creates a tab for easy removal. I like to create a theme for my tape colors: one color is for DIY projects or my own designs; the other is for sponsored posts, reviews, or outfits.
3. Now comes the fun part: brainstorm! Write ideas for your posts, sponsored posts, reviews, whatever on each piece of tape. (I found that ballpoint pen or Sharpie worked best on the waxy washi tape.)
4. Then, once brainstormed, schedule into your calendar by sticking into the appropriate days. Some ideas won’t have a place just yet, so I left them floating at the top, ready to rotate into next month if needs be.
5. Follow the calendar for your posting schedule. At the beginning of each week stick your posts into the day you actually posted them (in case you missed any or the schedule moved around). Then you’ll always be up to date – and won’t miss any posts!
I like that this is a permanent way to collect your thoughts and keep your blog schedule on hand, but you can still move ideas around as you go. You could use this for anything; it doesn’t have to be a blog calendar! It could be just general life or a to-do list, and the washi tape makes it look so pretty!
 Happy DIY’ing!
xo
Carly
Save
Leave Comment


