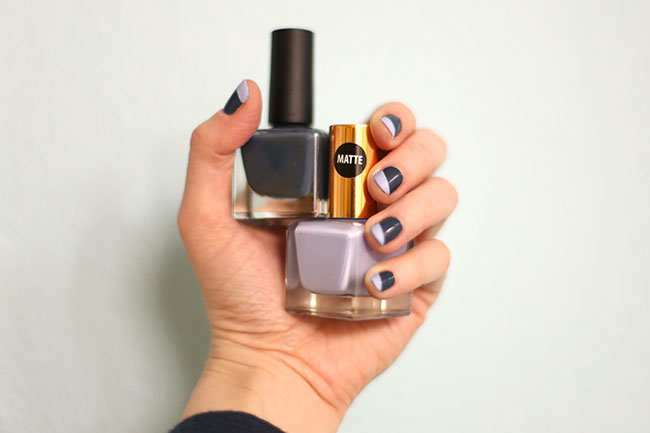
I’m big on squeezing every.last.drop of usefulness out of a manicure. If I’ve gone to the trouble of painting my nails (and it’s not gel)…I want them to last as long as humanly possible. Some bottles of nail polish say that to keep your mani fresh you need to paint another coat on your nails every 2 days. But seriously…who’s got time for that?? (Plus, if you’re sealing your manicure with a topcoat once done…wouldn’t you have to paint…and then seal…again?) I want minimal time, minimal fuss, and minimal damage to my nails.
This is where I’m at after about 10 days of wear using a base coat, regular nail polish, and topcoat. It’s almost time to retire it…or is it??
In the past, I’ve shared a Glitter Tip Refresh and a Sharpie Tip Refresh. How about another nail polish refresh…but this time playing with a matte version for contrast?
The tutorial is pretty self-explanatory: use tape to cordon off a cool diagonal stripe that makes the nail art cool city girl chic.
Peel tape off while tip color is still wet.
If you do the proper thing and add a layer of topcoat you’ll lose the pretty matte textural contrast…but your tip refresh will last longer. Matte polish chips a lot faster than regular, so you may only get a few more days out of this mani…but it’s good enough for me!
What do you guys think? Something you might try to keep that manicure going a little longer?
Spring is on its way, bringing a revival of pastel hues, flowery motifs, and lighter fabrics. Want to start the season off with a couple DIY projects to freshen up your wardrobe? Check out these 20 Spring Fashion DIY’s from the Chic Steals archives:
On a recent trip to one of my favorite gem supply shops in the Portland area (Ed’s House of Gems as I wrote in an earlier post here) I found some pretty agate slices that seemed like they would be perfect for drink coasters. Sure, I got the idea from Rablabs many years back…but those coasters were $65 at the time and way more than I wanted to spend. So I decided to make my own DIY agate drink coasters – with a little metal leaf to glam them up – and some cork “feet” to protect my table. You can find agate or geode slices many places now (including at your local Michael’s or Jo-Ann Fabrics stores!) and you can buy them on eBay or here as well. I also shared this project idea on Darby Smart awhile ago…but I figured it was high time to turn it into a full-fledged tutorial. So here it is!
You Need:
agate slices (you can use dyed agate though the dye may bleed a little) / Mod Podge or metal leafing glue / clean, soft brush / metal leaf sheet in your favorite metal color / adhesive cork disks (find these in the furniture protection section!) / small scissors / adhesive sealant (optional, not pictured)
How To:
1. Brush the edges of an agate slice with Mod Podge or metal leafing glue. (If your agate is dyed, you may find that the color starts bleeding into the glue here.)
2. Allow the glue to dry a few minutes so it is tacky. Roll onto a metal leafing sheet, pressing hard and covering all edges completely with the sheet. Just rip and reposition!
3. Making sure your brush is completely dry (or just use a different brush), gently brush off the excess metal leaf.
4. Usually the adhesive cork disks that are sold for furniture are too large for coasters, so cut each disk into smaller pieces.
5. Place the cork pieces at opposite ends of the agate slice so the slice will sit level on a flat surface.
And that’s it!
Pretty, colorful, organic coasters add a touch of class to any decor. If you’re concerned about the metal leaf coming off with use or exposure to liquids, I’d advise a quick spray of acrylic sealant around the edges of the coasters to make that permanent.
These coasters look so lovely shimmering in pale colors below translucent drinks!
What do you think? Is this a project you’ll be trying out?
xo
Carly
And if you love agate projects (or need something to do with any extra agate slices you may have acquired ;-)…my DIY Agate Keepsake Box (above) materials are still available on Darby Smart…and you can buy them individually in case you only need one or two supplies. (And…pssst! Right now [early Spring 2016] in Target’s front $1 section right in front of the doors…there are beautiful hinged WHITE wooden boxes…for only $3, which I suggest you snap up IMMEDIATELY to take advantage!)
So…sliced agate bookends are a big THING…but they can be ridiculously expensive. Just browse One King’s Lane or Joss & Main (and those are discounted to around $66, sheesh!) to see what I mean. Or Z Gallerie to see the full-priced version at $99. Even Target released a pair as part of their Threshold line…and of course the pair is about at the $25 mark. That’s still a price I think I can beat, so I began searching for how to create these lovely bookends for less.
Unfortunately to get good-quality sliced and polished matching agate chunks, you’ll have to pony up some cash, there’s no way around that. If you can score a pair on eBay for cheaper, that’s awesome…just be aware to factor in shipping to make sure you’re getting a good deal (those things can be heavy). Amazon has some great agate bookend options…similar to the lower pricepoint I found mine at – so I’d recommend buying through them!) Personally, I like to source my gems at local rock shops since I can get a pretty good deal depending on what they have in stock – and a favorite of mine is Ed’s House of Gems in NE Portland (don’t look at their website, it doesn’t begin to do this amazing store justice). Needless to say, I managed to find a beautiful pair of agate bookends there recently for a mere $18 – and set out to spice them up and make them look as nice as the Target (or the more expensive!) versions. (You could also cover the rough sides in actual gold or silver leaf if you wanted…but I had some spray paint on hand and figured that would be easiest.)
1. Spread painter’s tape over the flat sides of each bookend, extending the tape beyond the side.
Press firmly at the edge where the flat polished side meets the rough, rocky edge to prevent seepage.
2. Place on newspapers outside, and spray the rough, rocky sides gold. 1-2 coats should suffice.
3. Allow to dry.
4. (Optional) Hit the gold-painted side with a coating of acrylic sealer if you’re concerned about the gold rubbing off.
5. (Optional) Place sticky-back felt dots on the underside of the agate pieces to keep your shelving safe.
And there you have it!
You could easily just place the agate pieces as-is on your shelves and none would be the wiser…but I wanted some more finished pieces. They would also make a fabulous gift that looks oh-so-expensive…and you never have to tell anyone that you crafted them for a steal!
Happy DIY’ing!
If you’ve made your own version of these popular sliced DIY agate bookends – how did they work out for you? Let me know in the comments!
Oh metallic lurex thread, how I love thee!! It adds so much dimension, so much Wintry sparkle, so much glamour to just plain old fabrics. But it’s a demon to clean.
Once I found a beautiful silvery sweater at H&M on the clearance rack for a mere $8.95. And it happened to be in my size, too. I wore it often for many years. I wore it here, for example.
And then while at work one day I dropped my lunch on it. A small mouthful of leftover Thai drunken noodles. In oily brown sauce. And my favorite sweater was ruined forever.
I washed it multiple times, in both cold and warm water, and tried every stain remover known to woman. But nothing got the stain out of acrylic. That brownish-yellow stain would not budge. I tried to wear it after the unfortunate incident, but the stain was too obvious, and I felt self-conscious. I thought about discarding the sweater (heck, I had only paid $8.95 for it so it wasn’t a huge investment)…but I wanted to save it if I could.
And then I had an epiphany…to combine that trend of one big word on your shirt…with my poor abused sweater…hence forever covering up that stain and allowing me to wear it again (or at least, until it got too pilled and stretched out to even resemble clothing anymore). Hence this DIY. Here’s how to cover up that horrible stain on your own shirt if it has befallen similar circumstances:
DIY Shine Word Sweater (or, How to Cover a Stain on Your Sweater)
You Need:
sweater or top / black felt / fabric scissors / needle and matching thread / pins / graphic program to create your word if you’re not using the download below / printer (or print at an office store) / regular scissors
How To:
Choose what word you’re going to put on your top. It took me forever to finally choose a word (and yes, I browsed Pinterest, blogs, and magazines for what seemed like ages). But I found it: Shine. Quite ironically literal. So I went with that, and typed it out in Photoshop using the Ballpark Weiner font and printed out a copy of the word to see if the spacing and font would indeed cover up the stain. It did so I went with that.
Cut out the word using regular scissors. Don’t forget to cut out dots on i’s or punctuation as well. I didn’t cut out the negative space inside the letters at this point.
Pin the word to your felt.
Use fabric scissors to cut around your word carefully. You may need to make certain areas wider than the font so the felt doesn’t pull apart. For cutting the negative space out of the inside of loops, I just eyeballed it, cutting smaller than I needed to and then widening once I laid the cut-out on the original font.
Place the the cut out felt word to the center of your top, and pin down so it is flat.
Use a running stitch (looks like – – – – ) around the inside edges of the felt to secure the word to your top. This is long and tedious – make sure you have some Netflix or mindless TV to get you through. Also stitch on any i dots or punctuation as well. (If you’re dealing with a stretchy top like a sweater, be careful not to stretch the knit too much as you are sewing or else the finished word will pucker.)
And that’s it! A pretty upgrade to a soiled mistake…and I’ve just saved a major piece in my wardrobe. How to cover a stain on your sweater is really as easy as a bit of felt, time, and thread!
This is something you will need to hand-wash cold and lay flat to dry. You could also use suedecloth or any other fabric that doesn’t fray when you cut it – leather or vinyl I would think a little tough to hand-sew but you could always try it if you prefer that look.
Download my DIY Shine Word Sweater graphic here if you’d like to make your own “Shine” version (click below):
Carly J. Cais I am a DIY’er, designer, sewist, maker, and marketer. Chic Creative Life is where I share what I do, and help others bring their unique style into their own lives.


 On a recent trip to one of my favorite gem supply shops in the Portland area (


 So…sliced agate bookends are a big THING…but they can be ridiculously expensive. Just browse


 Oh metallic lurex thread, how I love thee!! It adds so much dimension, so much Wintry sparkle, so much glamour to just plain old fabrics. But it’s a demon to clean.
 I washed it multiple times, in both cold and warm water, and tried every stain remover known to woman. But nothing got the stain out of acrylic. That brownish-yellow stain would not budge. I tried to wear it after the unfortunate incident, but the stain was too obvious, and I felt self-conscious. I thought about discarding the sweater (heck, I had only paid $8.95 for it so it wasn’t a huge investment)…but I wanted to save it if I could.
 sweater or top / black felt / fabric scissors / needle and matching thread / pins / graphic program to create your word if you’re not using the download below / printer (or print at an office store) / regular scissors


 And that’s it! A pretty upgrade to a soiled mistake…and I’ve just saved a major piece in my wardrobe. How to cover a stain on your sweater is really as easy as a bit of felt, time, and thread!
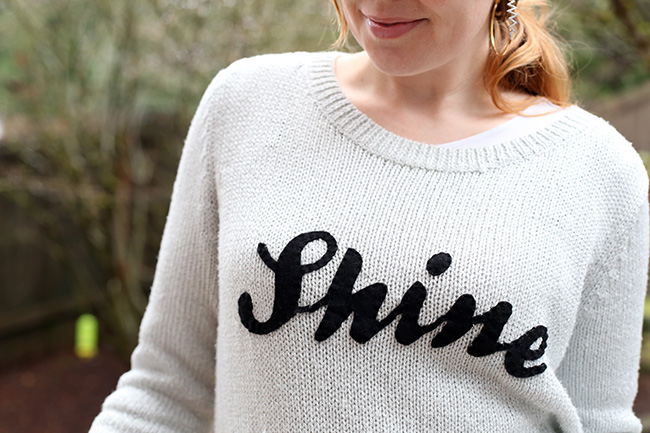 This is something you will need to hand-wash cold and lay flat to dry. You could also use suedecloth or any other fabric that doesn’t fray when you cut it – leather or vinyl I would think a little tough to hand-sew but you could always try it if you prefer that look.
 Shine on, my friends!


